- KHI SỰ TINH GIẢN LÀ ĐỈNH CAO CỦA CÔNG NGHỆ BÁN HÀNG 2026 - PHẦN MỀM BÁN HÀNG BASYS
- Phần mềm bán hàng cho hộ kinh doanh BASYS đơn giản ít thao tác
- [C#] Hướng dẫn tích hợp thêm menu vào System menu của ứng dụng
- [DEVEXPRESS] Hỗ trợ tìm kiếm highlight không dấu và không khoảng cách trên Gridview Filter
- [C#] Chia sẻ source code phần mềm Image Downloader tải hàng loạt hình ảnh từ danh sách link url
- [C#] Chụp hình và quay video từ camera trên winform
- [C#] Chia sẽ full source code tách file Pdf thành nhiều file với các tùy chọn
- Giới thiệu về Stock Tracker Widget - Công cụ theo dõi cổ phiếu và cảnh báo giá tăng giảm bằng C# và WPF
- [VB.NET] Chia sẻ công cụ nhập số tiền tự động định dạng tiền tệ Việt Nam
- [VB.NET] Hướng dẫn fill dữ liệu từ winform vào Microsoft word
- [VB.NET] Hướng dẫn chọn nhiều dòng trên Datagridview
- Hướng Dẫn Đăng Nhập Nhiều Tài Khoản Zalo Trên Máy Tính Cực Kỳ Đơn Giản
- [C#] Chia sẻ source code phần mềm đếm số trang tập tin file PDF
- [C#] Cách Sử Dụng DeviceId trong C# Để Tạo Khóa Cho Ứng Dụng
- [SQLSERVER] Loại bỏ Restricted User trên database MSSQL
- [C#] Hướng dẫn tạo mã QRcode Style trên winform
- [C#] Hướng dẫn sử dụng temp mail service api trên winform
- [C#] Hướng dẫn tạo mã thanh toán VietQR Pay không sử dụng API trên winform
- [C#] Hướng Dẫn Tạo Windows Service Đơn Giản Bằng Topshelf
- [C#] Chia sẻ source code đọc dữ liệu từ Google Sheet trên winform
[C#] EPPLUS thư viện Excel bá đạo trong lập trình csharp
Bài viết hôm nay, mình giới thiệu các bạn sử dụng thư viện EPPlus, một thư viện dùng để xử lý file Excel bá đạo trong lập trình C#.
Như cái tiêu đề ở trên thì trong series này mình sẽ hướng dẫn các bạn cách xử lý file excel trong C# một cách đơn giản nhất với thư viện EPPlus.
Bạn có thể tải về tại đây, hoặc cũng có thể tìm EPPlus trên Nuget và import vào.
Đầu tiên, chúng ta sẽ một class đơn giản, chứa thông tin các hàng trong Excel để thuận tiện cho việc demo.
public class TestItemClass
 {
     public int Id { get; set; }
     public string FullName { get; set; }
     public double Money { get; set; }
     public string Address { get; set; }
 }
Tiếp theo là tạo một list các item từ class mà ta đã tạo ở trên, các bạn cũng có thể sự dụng EF để lấy dữ liệu từ database cũng được.
Để đơn giản và tiết kiệm thời gian, mình sẽ tạo một list data giả như sau:
private List CreateTestItems()
{
    var resultsList = new List();
    for (int i = 0; i < 15; i++)
    {
        var a = new TestItemClass()
        {
            Id = i,
            Address = "Test Excel Address at " + i,
            Money = 20000 + i * 10,
            FullName = "Pham Hong Sang " + i
        };
        resultsList.Add(a);
    }
    return resultsList;
}
Các bước chuẩn bị đ
ã xong, bây giờ chúng ta bắt đầu chế biến món ăn :D.
Tạo File Excel
Chúng ta sẽ tạo file step by step như trong đoạn code dưới đây:
- Truyền vào một stream hoặc Memory Stream để thao tác với file Excel.
- Thiết lập các properties cho file Excel.
- Cuối cùng là đổ data vào file excel thông qua hàm LoadFromCollection với params truyền vào là 3 tham số :
- Collection: List các items
- PrintHeader: True or False để in thêm cái header ra file excel
- TableStyle: Chọn style cho table mà các bạn muốn
- Cuối cùng Save Sheet đó lại.
private Stream CreateExcelFile(Stream stream = null)
{
    var list = CreateTestItems();
    using (var excelPackage = new ExcelPackage(stream ?? new MemoryStream()))
    {
        // Tạo author cho file Excel
        excelPackage.Workbook.Properties.Author = "Hanker";
        // Tạo title cho file Excel
        excelPackage.Workbook.Properties.Title = "EPP test background";
        // thêm tí comments vào làm màu
        excelPackage.Workbook.Properties.Comments = "This is my fucking generated Comments";
        // Add Sheet vào file Excel
        excelPackage.Workbook.Worksheets.Add("First Sheet");
        // Lấy Sheet bạn vừa mới tạo ra để thao tác
        var workSheet = excelPackage.Workbook.Worksheets[1];
        // Đổ data vào Excel file
        workSheet.Cells[1, 1].LoadFromCollection(list, true, TableStyles.Dark9);
        // BindingFormatForExcel(workSheet, list);
        excelPackage.Save();
        return excelPackage.Stream;
    }
}
Export file Excel
Sau khi đã tạo xong File Excel thì bây giờ chúng ta sẽ export file Excel đó ra và xem thành phẩm nhé.
Bạn thêm hàm Export phía dưới vào HomeController, sau đó truy xuất tới đường link /Home/Export/ để xuất file excel ra.
[HttpGet]
public ActionResult Export()
{
    // Gọi lại hàm để tạo file excel
    var stream = CreateExcelFile();
    // Tạo buffer memory strean để hứng file excel
    var buffer = stream as MemoryStream;
    // Đây là content Type dành cho file excel, còn rất nhiều content-type khác nhưng cái này mình thấy okay nhất
    Response.ContentType = "application/vnd.openxmlformats-officedocument.spreadsheetml.sheet";
    // Dòng này rất quan trọng, vì chạy trên firefox hay IE thì dòng này sẽ hiện Save As dialog cho người dùng chọn thư mục để lưu
    // File name của Excel này là ExcelDemo
    Response.AddHeader("Content-Disposition", "attachment; filename=ExcelDemo.xlsx");
    // Lưu file excel của chúng ta như 1 mảng byte để trả về response
    Response.BinaryWrite(buffer.ToArray());
    // Send tất cả ouput bytes về phía clients
    Response.Flush();
    Response.End();
    return RedirectToAction("Index");
}
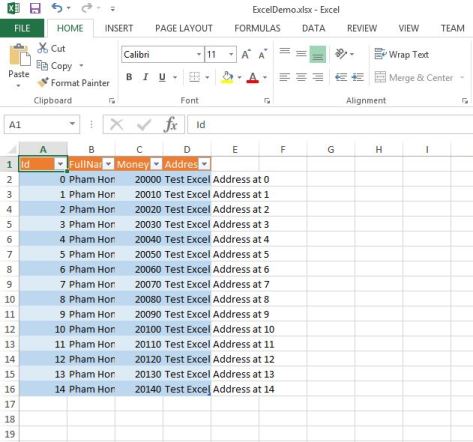
Đây là thành phẩm, trông hơi cùi bắp và khá chuối phải không =))). Ở bước tiếp theo, mình sẽ hướng dẫn các bạn format file excel sao cho đẹp mắt hơn.
Tút lại nhan sắc cho file Excel
Dưới đây là đoạn code để format cho file Excel, các bạn nhớ uncomment đoạn BindingFormatForExcel trong hàm CreateExcelFile nhé.
private void BindingFormatForExcel(ExcelWorksheet worksheet, List listItems)
{
    // Set default width cho tất cả column
    worksheet.DefaultColWidth = 10;
    // Tự động xuống hàng khi text quá dài
    worksheet.Cells.Style.WrapText = true;
    // Tạo header
    worksheet.Cells[1, 1].Value = "ID";
    worksheet.Cells[1, 2].Value = "Full Name";
    worksheet.Cells[1, 3].Value = "Address";
    worksheet.Cells[1, 4].Value = "Money";

    // Lấy range vào tạo format cho range đó ở đây là từ A1 tới D1
    using (var range = worksheet.Cells["A1:D1"])
    {
        // Set PatternType
        range.Style.Fill.PatternType = ExcelFillStyle.DarkGray;
        // Set Màu cho Background
        range.Style.Fill.BackgroundColor.SetColor(Color.Aqua);
        // Canh giữa cho các text
        range.Style.HorizontalAlignment = ExcelHorizontalAlignment.Center;
        // Set Font cho text  trong Range hiện tại
        range.Style.Font.SetFromFont(new Font("Arial", 10));
        // Set Border
        range.Style.Border.Bottom.Style = ExcelBorderStyle.Thick;
        // Set màu ch Border
        range.Style.Border.Bottom.Color.SetColor(Color.Blue);
    }

    // Đỗ dữ liệu từ list vào
    for (int i = 0; i < listItems.Count; i++)
    {
        var item = listItems[i];
        worksheet.Cells[i + 2, 1].Value = item.Id + 1;
        worksheet.Cells[i + 2, 2].Value = item.FullName;
        worksheet.Cells[i + 2, 3].Value = item.Address;
        worksheet.Cells[i + 2, 4].Value = item.Money;
        // Format lại color nếu như thỏa điều kiện
        if (item.Money > 20050)
        {
            // Ở đây chúng ta sẽ format lại theo dạng fromRow,fromCol,toRow,toCol
            using (var range = worksheet.Cells[i + 2, 1, i + 2, 4])
            {
                // Format text đỏ và đậm
                range.Style.Font.Color.SetColor(Color.Red);
                range.Style.Font.Bold = true;
            }
        }

    }
    // Format lại định dạng xuất ra ở cột Money
    worksheet.Cells[2, 4, listItems.Count + 4, 4].Style.Numberformat.Format = "$#,##.00";
    // fix lại width của column với minimum width là 15
    worksheet.Cells[1, 1, listItems.Count + 5, 4].AutoFitColumns(15);

    // Thực hiện tính theo formula trong excel
    // Hàm Sum
    worksheet.Cells[listItems.Count + 3, 3].Value = "Total is :";
    worksheet.Cells[listItems.Count + 3, 4].Formula = "SUM(D2:D" + (listItems.Count + 1) + ")";
    // Hàm SumIf
    worksheet.Cells[listItems.Count + 4, 3].Value = "Greater than 20050 :";
    worksheet.Cells[listItems.Count + 4, 4].Formula = "SUMIF(D2:D" + (listItems.Count + 1) + ",">20050")";
    // Tinh theo %
    worksheet.Cells[listItems.Count + 5, 3].Value = "Percentatge: ";
    worksheet.Cells[listItems.Count + 5, 4].Style.Numberformat.Format = "0.00%";
    // Dòng này có nghĩa là ở column hiện tại lấy với địa chỉ (Row hiện tại - 1)/ (Row hiện tại - 2) Cùng một colum
    worksheet.Cells[listItems.Count + 5, 4].FormulaR1C1 = "(R[-1]C/R[-2]C)";
}
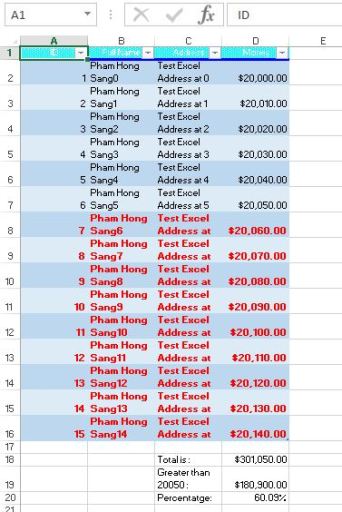
Bây giờ thì bạn hãy build lại rồi Export filed excel đó ra thử nhé :D. Bạn đã export thành công 1 file excel rồi đó.

Theo toidicodedao


