NEWS
- Phần mềm làm mờ tin nhắn Zalo PC trên Desktop - Bảo mật và chống nhìn trộm - Chặn đang soạn tin nhắn
- KHI SỰ TINH GIẢN LÀ ĐỈNH CAO CỦA CÔNG NGHỆ BÁN HÀNG 2026 - PHẦN MỀM BÁN HÀNG BASYS
- Phần mềm bán hàng cho hộ kinh doanh BASYS đơn giản ít thao tác
- [C#] Hướng dẫn tích hợp thêm menu vào System menu của ứng dụng
- [DEVEXPRESS] Hỗ trợ tìm kiếm highlight không dấu và không khoảng cách trên Gridview Filter
- [C#] Chia sẻ source code phần mềm Image Downloader tải hàng loạt hình ảnh từ danh sách link url
- [C#] Chụp hình và quay video từ camera trên winform
- [C#] Chia sẽ full source code tách file Pdf thành nhiều file với các tùy chọn
- Giới thiệu về Stock Tracker Widget - Công cụ theo dõi cổ phiếu và cảnh báo giá tăng giảm bằng C# và WPF
- [VB.NET] Chia sẻ công cụ nhập số tiền tự động định dạng tiền tệ Việt Nam
- [VB.NET] Hướng dẫn fill dữ liệu từ winform vào Microsoft word
- [VB.NET] Hướng dẫn chọn nhiều dòng trên Datagridview
- Hướng Dẫn Đăng Nhập Nhiều Tài Khoản Zalo Trên Máy Tính Cực Kỳ Đơn Giản
- [C#] Chia sẻ source code phần mềm đếm số trang tập tin file PDF
- [C#] Cách Sử Dụng DeviceId trong C# Để Tạo Khóa Cho Ứng Dụng
- [SQLSERVER] Loại bỏ Restricted User trên database MSSQL
- [C#] Hướng dẫn tạo mã QRcode Style trên winform
- [C#] Hướng dẫn sử dụng temp mail service api trên winform
- [C#] Hướng dẫn tạo mã thanh toán VietQR Pay không sử dụng API trên winform
- [C#] Hướng Dẫn Tạo Windows Service Đơn Giản Bằng Topshelf
[C#] Hướng dẫn sử dụng thư viện Outlook Interop để gởi và nhận email
Đăng bởi: Thảo Meo - Lượt xem: 17594
Xin chào các bạn đọc, bạn viết hôm nay, mình sẽ tiếp tục hướng dẫn các bạn cách gởi và nhận email sử dụng thư viện Outlook C# trong bộ office của microsoft bằng ngôn ngữ lập trình C#.
[C#] Send and Receive Email with Outlook Library
Bài viết hướng dẫn này, yêu cầu các bạn đã cài sẵn Microsoft Outlook trên máy tính và đã cấu hình các thông số email sender của bạn vào ứng dụng trước.
Ví dụ: các thông tin cấu hình email, mật khẩu, địa chỉ pop server, smtp server và các cổng, các bạn phải cấu hình trên ứng dụng Outlook.
Dưới đây là giao diện demo ứng dụng gởi và nhận email C#:
- Đầu tiên, các bạn cần import thư viện Microsoft.Office.Interop.Outlook
Các bạn, có thể import thư viện như hình bên dưới:
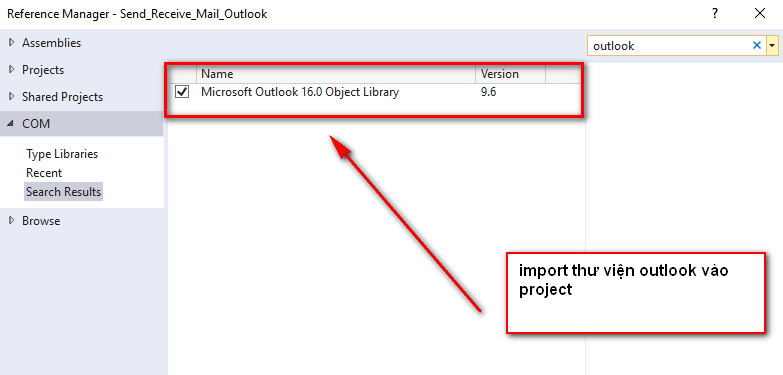
Sau khi, import thư viện vào xong, chúng ta sẽ code import thư viện vào project của mình.
using outlook = Microsoft.Office.Interop.Outlook;1. Viết code gởi email
private void btnSend_Click(object sender, EventArgs e)
        {
            outlook.Application app = new outlook.Application();
            outlook.MailItem mail = (outlook.MailItem)app.CreateItem(outlook.OlItemType.olMailItem);
            mail.To = txt_to.Text;
            mail.Subject = txt_subject.Text;
            mail.Body = txt_message.Text;
            mail.Importance = outlook.OlImportance.olImportanceHigh;
            ((outlook.MailItem)mail).Send();
            MessageBox.Show("Đã gởi Email đến " + txt_to.Text + " thành công!");
        }
2. Viết code nhận email vào datagridview C#
private void btnReceive_Click(object sender, EventArgs e)
        {
            try
            {
                outlook.Application app = new outlook.Application();
                outlook.NameSpace ns = app.GetNamespace("MAPI");
                outlook.MAPIFolder inbox = ns.GetDefaultFolder(outlook.OlDefaultFolders.olFolderInbox);
                ns.SendAndReceive(true);

                table = new DataTable();
                table.Columns.Add("Subject", typeof(string));
                table.Columns.Add("Sender", typeof(string));
                table.Columns.Add("Body", typeof(string));
                table.Columns.Add("Date", typeof(string));

                dataGrid.DataSource = table;
                foreach (outlook.MailItem item in inbox.Items)
                {
                    table.Rows.Add(new object[] { item.Subject, item.SenderName, item.HTMLBody, item.SentOn.ToLongDateString() + " " + item.SentOn.ToLongTimeString() });
                }
            }
            catch (Exception ex)
            {

                // MessageBox.Show(ex.Message);
            }

        }
3. Viết sự kiện khi click vào từng dòng trên DataGridview thì hiển thị nội dung của email
private void dataGrid_CellClick(object sender, DataGridViewCellEventArgs e)
        {
            if (e.RowIndex < table.Rows.Count && e.RowIndex >= 0)
            {
                webBrowser1.DocumentText = table.Rows[e.RowIndex]["Body"].ToString();
            }
        }
Chúc các bạn thành công, nếu thấy hay nhớ like và share nhé các bạn.
Các bạn có thể download source ở link bên dưới.
THÔNG TIN TÁC GIẢ
NGUYỄN THẢO
Youtube Channel: https://www.youtube.com/@thaomeotv

BÀI VIẾT LIÊN QUAN
Đăng bởi: Thảo Meo - Lượt xem: 17594
