- Phần mềm làm mờ tin nhắn Zalo PC trên Desktop - Bảo mật và chống nhìn trộm - Chặn đang soạn tin nhắn
- KHI SỰ TINH GIẢN LÀ ĐỈNH CAO CỦA CÔNG NGHỆ BÁN HÀNG 2026 - PHẦN MỀM BÁN HÀNG BASYS
- Phần mềm bán hàng cho hộ kinh doanh BASYS đơn giản ít thao tác
- [C#] Hướng dẫn tích hợp thêm menu vào System menu của ứng dụng
- [DEVEXPRESS] Hỗ trợ tìm kiếm highlight không dấu và không khoảng cách trên Gridview Filter
- [C#] Chia sẻ source code phần mềm Image Downloader tải hàng loạt hình ảnh từ danh sách link url
- [C#] Chụp hình và quay video từ camera trên winform
- [C#] Chia sẽ full source code tách file Pdf thành nhiều file với các tùy chọn
- Giới thiệu về Stock Tracker Widget - Công cụ theo dõi cổ phiếu và cảnh báo giá tăng giảm bằng C# và WPF
- [VB.NET] Chia sẻ công cụ nhập số tiền tự động định dạng tiền tệ Việt Nam
- [VB.NET] Hướng dẫn fill dữ liệu từ winform vào Microsoft word
- [VB.NET] Hướng dẫn chọn nhiều dòng trên Datagridview
- Hướng Dẫn Đăng Nhập Nhiều Tài Khoản Zalo Trên Máy Tính Cực Kỳ Đơn Giản
- [C#] Chia sẻ source code phần mềm đếm số trang tập tin file PDF
- [C#] Cách Sử Dụng DeviceId trong C# Để Tạo Khóa Cho Ứng Dụng
- [SQLSERVER] Loại bỏ Restricted User trên database MSSQL
- [C#] Hướng dẫn tạo mã QRcode Style trên winform
- [C#] Hướng dẫn sử dụng temp mail service api trên winform
- [C#] Hướng dẫn tạo mã thanh toán VietQR Pay không sử dụng API trên winform
- [C#] Hướng Dẫn Tạo Windows Service Đơn Giản Bằng Topshelf
[DEVEXPRESS] Thêm button Next and Previous trên Component DateEdit
Xin chào các bạn, bài viết hôm nay mình sẽ tiếp tục hướng dẫn các bạn cách thêm button Previous và Next trong DateEdit của Devexpress C#.
[DEVEXPRESS] Add Button Next And Previous in DateEdit C#
Trong công cụ, DateEdit của Devexpress cho phép các bạn chọn ngày tháng.
Tuy nhiên, nếu chúng ta muốn lùi về một ngày hoặc tới tiếp một ngày, thay vì chúng ta phải xổ combo Date ra để chọn thì sẽ mất thời gian nhiều hơn.
Nếu chúng ta thiết kế thêm 2 button Next và Previous cho DateEdit thì sẽ tiện lợi hơn.
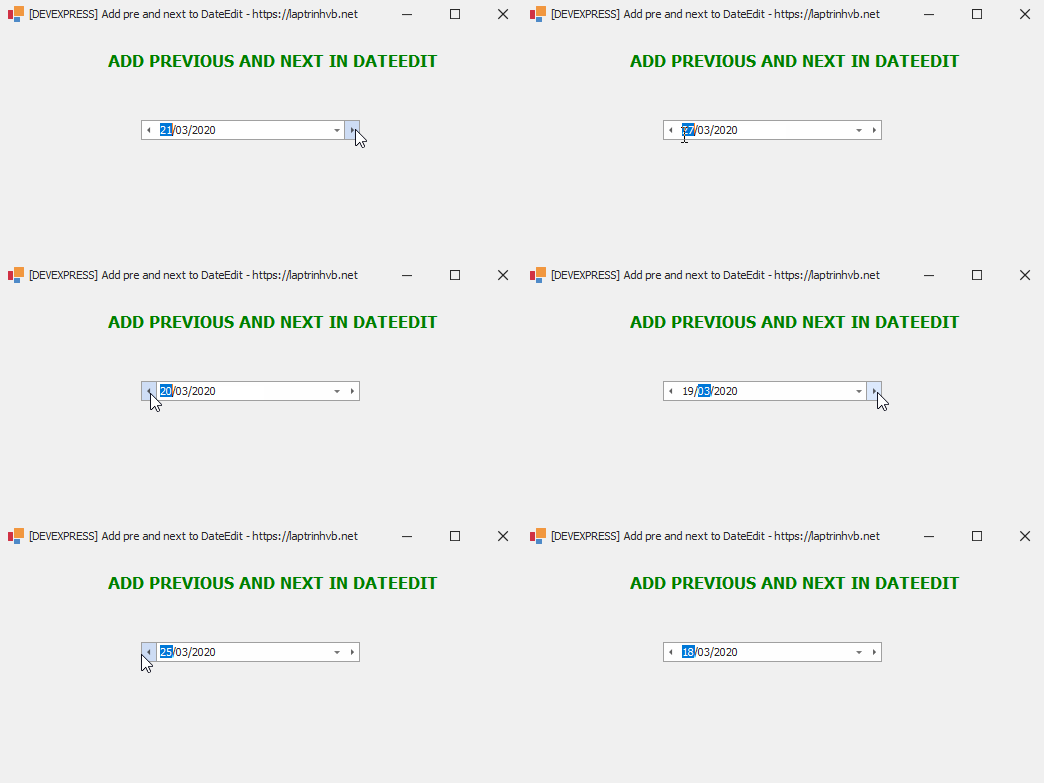
Các bạn có thể nhìn demo ứng dụng bên dưới đây, mình di chuyển ngày rất dễ dàng và nhanh chóng.

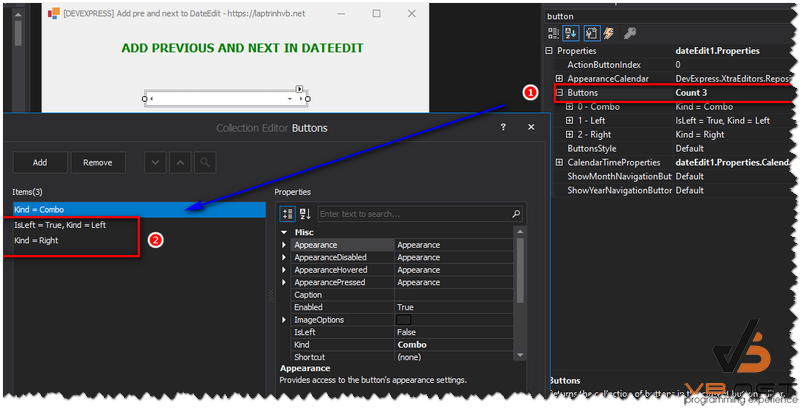
Để sử dụng, đầu tiên các bạn kéo component Date Edit ra vào chọn thuộc tính Button và thêm vào hai button như hình bên dưới:

Và tiếp theo các bạn chọn thuộc tính Button Click để viết sự kiện cho 2 button left và right mình mới thêm vào.
Full source code DateEdit Devexpress C#:
using DevExpress.XtraEditors;
using System;
using System.Collections.Generic;
using System.ComponentModel;
using System.Data;
using System.Drawing;
using System.Linq;
using System.Text;
using System.Windows.Forms;

namespace PreNextDateEdit
{
    public partial class Form1 : DevExpress.XtraEditors.XtraForm
    {
        public Form1()
        {
            InitializeComponent();
            dateEdit1.EditValue = DateTime.Now;
        }

        private void dateEdit1_Properties_ButtonClick(object sender, DevExpress.XtraEditors.Controls.ButtonPressedEventArgs e)
        {
            DateEdit edit = dateEdit1;
            if (edit.EditValue == null) return;
            switch (e.Button.Kind)
            {
                case DevExpress.XtraEditors.Controls.ButtonPredefines.Left:
                    edit.EditValue = ((DateTime)edit.EditValue).AddDays(-1);
                    break;
                case DevExpress.XtraEditors.Controls.ButtonPredefines.Right:
                    edit.EditValue = ((DateTime)edit.EditValue).AddDays(1);
                    break;
                default:
                    break;
            }
        }
    }
}
Thanks for watching!


