- Phần mềm làm mờ tin nhắn Zalo PC trên Desktop - Bảo mật và chống nhìn trộm - Chặn đang soạn tin nhắn
- KHI SỰ TINH GIẢN LÀ ĐỈNH CAO CỦA CÔNG NGHỆ BÁN HÀNG 2026 - PHẦN MỀM BÁN HÀNG BASYS
- Phần mềm bán hàng cho hộ kinh doanh BASYS đơn giản ít thao tác
- [C#] Hướng dẫn tích hợp thêm menu vào System menu của ứng dụng
- [DEVEXPRESS] Hỗ trợ tìm kiếm highlight không dấu và không khoảng cách trên Gridview Filter
- [C#] Chia sẻ source code phần mềm Image Downloader tải hàng loạt hình ảnh từ danh sách link url
- [C#] Chụp hình và quay video từ camera trên winform
- [C#] Chia sẽ full source code tách file Pdf thành nhiều file với các tùy chọn
- Giới thiệu về Stock Tracker Widget - Công cụ theo dõi cổ phiếu và cảnh báo giá tăng giảm bằng C# và WPF
- [VB.NET] Chia sẻ công cụ nhập số tiền tự động định dạng tiền tệ Việt Nam
- [VB.NET] Hướng dẫn fill dữ liệu từ winform vào Microsoft word
- [VB.NET] Hướng dẫn chọn nhiều dòng trên Datagridview
- Hướng Dẫn Đăng Nhập Nhiều Tài Khoản Zalo Trên Máy Tính Cực Kỳ Đơn Giản
- [C#] Chia sẻ source code phần mềm đếm số trang tập tin file PDF
- [C#] Cách Sử Dụng DeviceId trong C# Để Tạo Khóa Cho Ứng Dụng
- [SQLSERVER] Loại bỏ Restricted User trên database MSSQL
- [C#] Hướng dẫn tạo mã QRcode Style trên winform
- [C#] Hướng dẫn sử dụng temp mail service api trên winform
- [C#] Hướng dẫn tạo mã thanh toán VietQR Pay không sử dụng API trên winform
- [C#] Hướng Dẫn Tạo Windows Service Đơn Giản Bằng Topshelf
[C#] Hướng dẫn custom Button trên Winform
Xin chào các bạn, bài viết hôm nay mình sẽ tiếp tục chia sẻ đến các bạn cách Custom Button trong lập trình C# winform.
[C#] Custom Button Winform
Mặc định button trong Visual studio toolbox mặc định, các bạn sẽ không bo tròn được button.
Và không có chọn đường màu viền cho border button.
Dưới đây, mình sẽ gởi cho các bạn đoạn code Custom Button này lại, các bạn có thể download và chỉnh sửa lại theo ý của bạn.
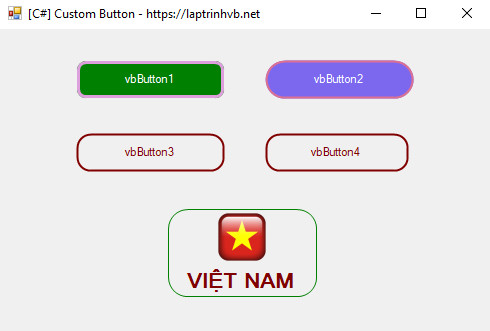
Giao diện demo ứng dụng Custom Button C#, Winform:

Đầu tiên, các bạn tạo cho mình một class với tên: VBButton.cs
using System;
using System.Collections.Generic;
using System.Linq;
using System.Text;
using System.Threading.Tasks;

using System.Windows.Forms;
using System.Drawing;
using System.Drawing.Drawing2D;
using System.ComponentModel;

namespace CustomButton
{
    public class VBButton : Button
    {
        //Fields
        private int borderSize = 0;
        private int borderRadius = 20;
        private Color borderColor = Color.PaleVioletRed;

        //Properties
        [Category("Custom Props")]
        public int BorderSize
        {
            get { return borderSize; }
            set
            {
                borderSize = value;
                this.Invalidate();
            }
        }

        [Category("Custom Props")]
        public int BorderRadius
        {
            get { return borderRadius; }
            set
            {
                borderRadius = value;
                this.Invalidate();
            }
        }

        [Category("Custom Props")]
        public Color BorderColor
        {
            get { return borderColor; }
            set
            {
                borderColor = value;
                this.Invalidate();
            }
        }
        [Category("Custom Props")]
        public Color BackgroundColor
        {
            get { return this.BackColor; }
            set { this.BackColor = value; }
        }

        [Category("Custom Props")]
        public Color TextColor
        {
            get { return this.ForeColor; }
            set { this.ForeColor = value; }
        }

        //Constructor
        public VBButton()
        {
            this.FlatStyle = FlatStyle.Flat;
            this.FlatAppearance.BorderSize = 0;
            this.Size = new Size(150, 40);
            this.BackColor = Color.MediumSlateBlue;
            this.ForeColor = Color.White;
            this.Resize += new EventHandler(Button_Resize);
        }

        //Methods
        private GraphicsPath GetFigurePath(Rectangle rect, float radius)
        {
            GraphicsPath path = new GraphicsPath();
            float curveSize = radius * 2F;

            path.StartFigure();
            path.AddArc(rect.X, rect.Y, curveSize, curveSize, 180, 90);
            path.AddArc(rect.Right - curveSize, rect.Y, curveSize, curveSize, 270, 90);
            path.AddArc(rect.Right - curveSize, rect.Bottom - curveSize, curveSize, curveSize, 0, 90);
            path.AddArc(rect.X, rect.Bottom - curveSize, curveSize, curveSize, 90, 90);
            path.CloseFigure();
            return path;
        }

        protected override void OnPaint(PaintEventArgs pevent)
        {
            base.OnPaint(pevent);
            pevent.Graphics.SmoothingMode = SmoothingMode.AntiAlias;

            Rectangle rectSurface = this.ClientRectangle;
            Rectangle rectBorder = Rectangle.Inflate(rectSurface, -borderSize, -borderSize);
            int smoothSize = 2;
            if (borderSize > 0)
                smoothSize = borderSize;

            if (borderRadius > 2) //Rounded button
            {
                using (GraphicsPath pathSurface = GetFigurePath(rectSurface, borderRadius))
                using (GraphicsPath pathBorder = GetFigurePath(rectBorder, borderRadius - borderSize))
                using (Pen penSurface = new Pen(this.Parent.BackColor, smoothSize))
                using (Pen penBorder = new Pen(borderColor, borderSize))
                {
                    //Button surface
                    this.Region = new Region(pathSurface);
                    //Draw surface border for HD result
                    pevent.Graphics.DrawPath(penSurface, pathSurface);

                    //Button border
                    if (borderSize >= 1)
                        //Draw control border
                        pevent.Graphics.DrawPath(penBorder, pathBorder);
                }
            }
            else //Normal button
            {
                //Button surface
                this.Region = new Region(rectSurface);
                //Button border
                if (borderSize >= 1)
                {
                    using (Pen penBorder = new Pen(borderColor, borderSize))
                    {
                        penBorder.Alignment = PenAlignment.Inset;
                        pevent.Graphics.DrawRectangle(penBorder, 0, 0, this.Width - 1, this.Height - 1);
                    }
                }
            }
        }
        protected override void OnHandleCreated(EventArgs e)
        {
            base.OnHandleCreated(e);
            this.Parent.BackColorChanged += new EventHandler(Container_BackColorChanged);
        }

        private void Container_BackColorChanged(object sender, EventArgs e)
        {
            this.Invalidate();
        }

        private void Button_Resize(object sender, EventArgs e)
        {
            if (borderRadius > this.Height)
                borderRadius = this.Height;
        }
    }
}
Sau khi tạo xong, các bạn chạy build project hoặc bấm F5 xong đóng ứng dụng lại.
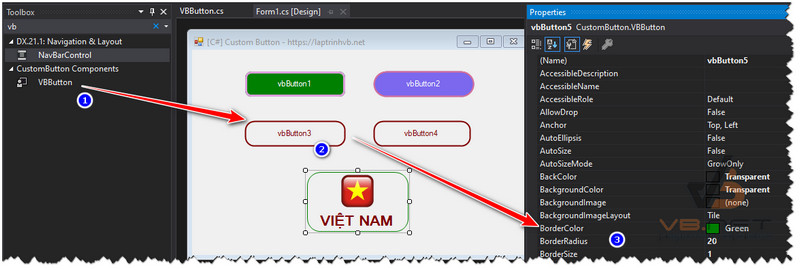
Các bạn vào Form1.cs, nhìn ở bên thanh Toolbox bên trái, các bạn sẽ thấy thêm Component VBButton.
Và các bạn có thể kéo ctrol này ra sử dụng bình thường.

Thanks for watching!


